


ProfessionalCommunity Edition
Miscellaneous DOM Invader settings
-
Last updated: March 1, 2024
-
Read time: 3 Minutes
To access the DOM Invader settings menu, click the Burp Suite logo in the upper-right corner of the browser, then switch to the DOM Invader tab.
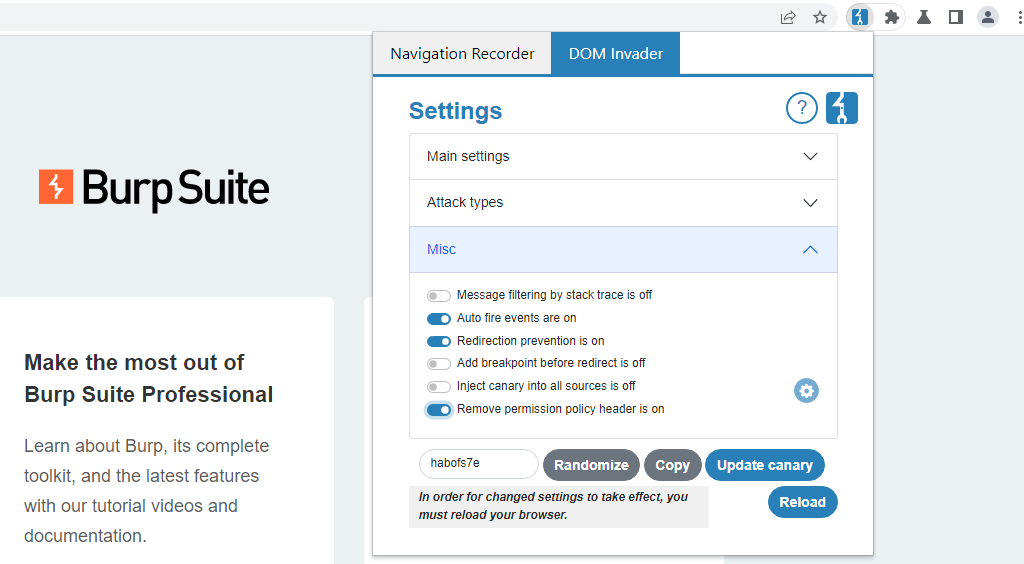
From the Misc section, you can control the following options.
Message filtering by stack trace
Some websites trigger a large number of messages, which can make testing difficult due to the amount of noise. When this setting is enabled, DOM Invader compares the stack trace of each entry and hides any that point to the same location in the code as an existing entry.
Auto-fire events
When this setting is enabled, DOM Invader automatically triggers a click and mouseover event on every element as soon as the page loads. This is useful in cases where your injected payload only reaches a sink when one of these events occurs.
Redirection prevention
You may find that some of your actions cause a client-side redirect to another page. This can interfere with testing because the sources and sinks found by DOM Invader will be cleared and updated with sources and sinks found on the new page instead.
When this setting is enabled, DOM Invader blocks any client-side redirects so that you remain on the same page. However, redirects to javascript: URLs, or any redirects initiated by the Inject URL button, still work as normal.
Add breakpoint before redirect
Instead of blocking client-side redirects altogether using the Redirection prevention setting, you can enable this feature to set a breakpoint just before the code that triggers a redirect. Currently, this isn't possible using Chrome's standard DevTools.
Adding a breakpoint enables you to look at the call stack in the browser's DevTools to see where the redirect is happening, which can be useful for debugging.
Inject canary into all sources
When this setting is enabled, DOM Invader automatically injects the canary in any identified sources on the page. It appends a unique string to the canary for each source so that you can easily identify which sources flow into each sink.
In practice, injecting the canary everywhere is likely to just prevent the site from working correctly. DOM Invader lets you customize which parameters and sources are used to inject the canary, so you can fine-tune this behavior as needed. If you click the cog icon next to this setting, you can make the following adjustments:
-
Disable specific sources so that DOM Invader skips them. You might want to gradually eliminate problematic sources in order to use this feature more effectively. You might also want to disable sources in order to focus on a specific one. This saves you having to manually paste the canary into the source every time you load a new page.
-
Provide a comma-separated list of specific parameters that DOM Invader should inject the canary into.

Configuring callbacks
You can configure DOM Invader to execute custom callback functions whenever it identifies sources, sinks, or web messages. You can create your own custom callback or use the default, which enables you to export results by simply logging them to the console.
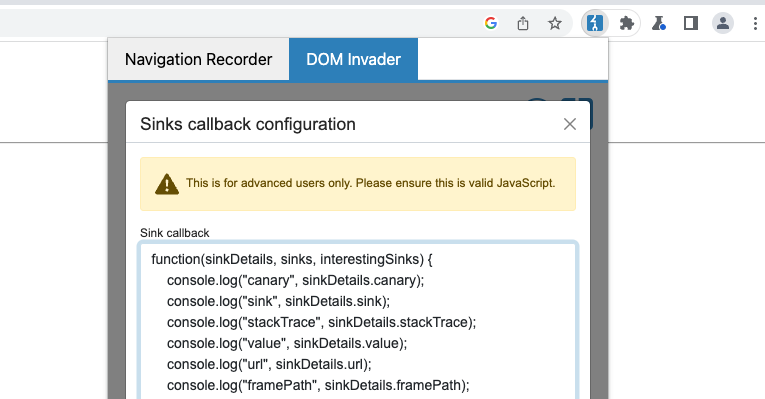
Another useful callback might contain a debugger statement to pause script execution whenever DOM Invader identifies a controllable sink. This would enable you to study the call stack.
The default callback function is ready to use, but you need to enable it as follows:
-
From the DOM Invader settings menu, click the cog icon next to the main DOM Invader switch to open the sources and sink settings.
-
Select either the Sources, Sinks, or Messages tab, depending on which type of result you want to configure a callback for.
-
Click the Callback configuration button to view DOM Invader's default callback function. Initially, this is deactivated.
-
Click the text field containing the script to activate it.
-
Either leave the script as it is, or make the changes you want, then click Save.
-
Click Reload to refresh the browser. This is necessary for your changes to take effect.
-
Use DOM Invader as normal and check that the callback works as expected.
Remove Permissions-Policy header
When this setting is enabled, DOM Invader automatically strips the Permissions-Policy header from responses when present.
Some websites set directives via the Permissions-Policy header that block features that are essential to DOM Invader's functionality, such as synchronous XHR. In this case, DOM Invader informs you via the console and prompts you to enable this setting.