


DAST
Configuring Burp Suite DAST (Standard)
-
Last updated: June 18, 2026
-
Read time: 4 Minutes
The first time you access Burp Suite DAST after installation, the application prompts you to create an administrator user.
For standard instances with an external database, the application also prompts you to enter your database information and gives you the option to upload a TLS certificate for the web server.
Note
Your browser may give you an "invalid certificate" message when you first access Burp Suite DAST. This is normal, and it is safe to continue. You can resolve this issue by uploading a valid TLS certificate, as described below.
Uploading a TLS certificate

If you're using an external database, Burp Suite DAST displays the Upload a TLS certificate page when you first run the application.
This page enables you to replace the self-signed TLS certificate that was generated during installation with one that is valid for your organization. This step is optional, but recommended, as your users may be unable to access the application without the correct certificate in place.
The TLS certificate must have the following properties:
-
Use a
PKCS#12certificate with a.p12file extension. The.pfxformat is not supported. - The certificate must have a password.
- The certificate must include a Subject Alternative Name (SAN).
Note
We recommend you upload a certificate that is signed by a certificate authority that your browser trusts. If you upload a certificate that your browser does not recognize (such as another self-signed certificate), then the app will be unable to verify the certificate. Refresh the page on the uploading screen in order to continue with the configuration process.
Alternatively, click Skip this step to open the Connect to your database page without uploading a certificate.
Configuring TLS cipher suites
You can use environment variables to configure the cipher suites used by Burp Suite DAST. For information on using environment variables, refer to the documentation for your operating system.
Note
This configuration controls cipher suites for external communication with Burp Suite DAST only. You cannot configure the cipher suites used internally between Burp Suite DAST components.
To configure the enabled TLS cipher suites, set the environment variable BSEE_TLS_CIPHER_SUITES as follows:
-
DEFAULT: Use secure TLS 1.2 and TLS 1.3 cipher suites only. -
TLS1.3: Use secure TLS 1.3 cipher suites only. -
FIPS-140-2: Use the cipher suites that are compatible with TLS 1.2 and TLS 1.3, and are considered secure by FIPS-140-2.
If you want to create a custom configuration, you can list more than one cipher suite in the environment variable. For example, you can combine a preset with some additional cipher suites:
BSEE_TLS_CIPHER_SUITES=FIPS-140-2,TLS_DHE_DSS_WITH_AES_256_CBC_SHA,TLS_RSA_WITH_AES_256_CBC_SHA
You can see the full list of the ciphers we currently support in the enterpriseServer log. For more information, see Support pack.
Configuring database details
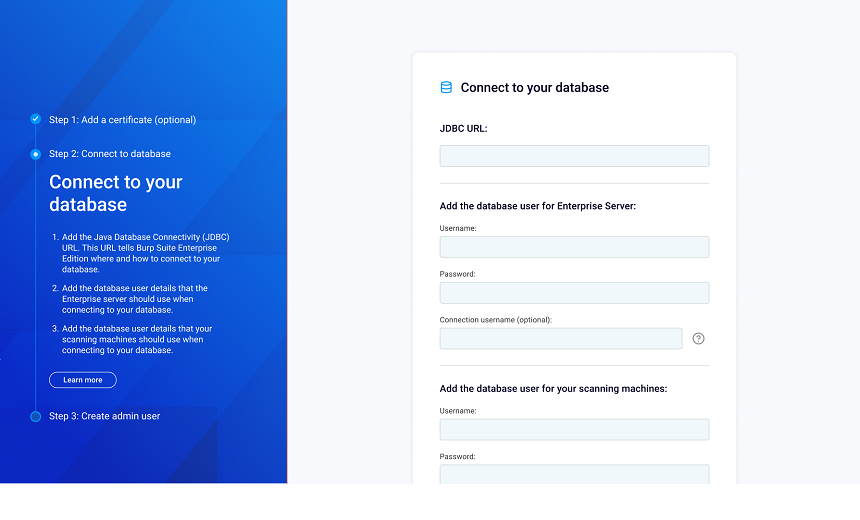
The Connect to your database page enables you to specify external database details. This page of the setup flow is not displayed if you are deploying a standard installation that uses the embedded database.
Note
Before you attempt to connect to your database, please make sure that you have configured it to work with Burp Suite DAST. For details on how to do this, see Setting up the external database.
To configure database details:
- From the Connect to your database page, enter the JDBC URL of the database you want to connect to. Note that the required format for the URL changes depending on the type of database you want to use. For more information on JDBC URLs in Burp Suite DAST, see Database connection URL format.
-
Enter the Username and Password of the DAST server database user. This is the user that the DAST server will use when connecting to the database.
- Additionally, if your database requires a different format for the username when connecting externally (for example, user-name@server-name), add a Connection username for the DAST server database user.
-
Enter the Username and Password of the scanning machine database user. This is the user that scanning machines will use when connecting to the database.
- Additionally, if your database requires a different format for the username when connecting externally (for example, user-name@server-name), add a Connection username for the scanning machine database user.
- Click Next to save your database details and display the Create admin user page.
Configuring admin user details
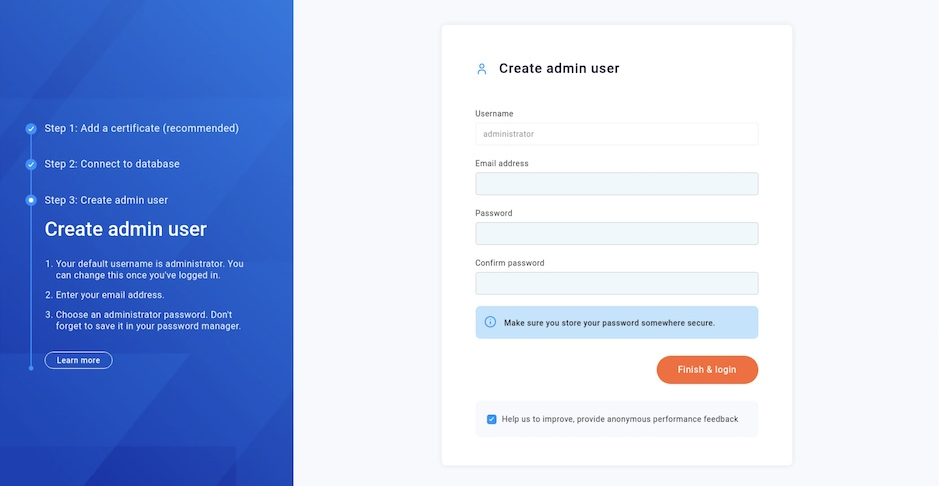
The final step in the configuration process is to set up your Burp Suite DAST admin user. This step is necessary for all Burp Suite DAST instances.
To do so, enter the Email address and Password for the admin user on the Create admin user page, then confirm your password and click Finish & login to complete the configuration process. The application displays the Sign in page.
Warning
Make sure you save your password somewhere secure. You will need it to log in to Burp Suite DAST.
Once you have configured your admin username, you can sign in and begin using Burp Suite DAST. When you log in to Burp Suite DAST for the first time, you are prompted to activate your license.
Next step - Activate your license