WebSocket Turbo Intruder: Unearthing the WebSocket Goldmine
-
Published: Wednesday, 17 September 2025 at 12:40 UTC
-
Updated: Thursday, 18 September 2025 at 07:50 UTC
-

Many testers and tools give up the moment a protocol upgrade to WebSocket occurs, or only perform shallow analysis. This is a huge blind spot, leaving many bugs like Broken Access Controls, Race conditions, and SQL injection undetected. In this post, we look at the new version of WebSocket Turbo Intruder, a Burp Suite extension that brings Turbo Intruder’s fast attack engine to WebSocket testing. We will also talk about why auto-scanning WebSocket apps is hard, and how this tool helps fix those problems.
Outline
Introduction
WebSocket Turbo Intruder is a Burp Suite extension for fuzzing WebSocket messages with custom Python code. It extends the Burp Suite engine so it can exploit the WebSocket protocol specific vulnerabilities.
Key features
- High speed - supports thousands of messages per second
- HTTP adapter - automate testing by integrating with existing HTTP scanners
- Smart filtering - hides boring responses so you can focus on interesting results
While WebSocket Turbo Intruder includes a custom engine for speed, it’s not as battle-tested as Burp’s built-in engine. If you see errors or connection issues, try switching back to the default engine. Also, this tool is designed for high-volume testing against a single target - since WebSocket connections must stay open, testing large scopes is tricky and not well supported.
Getting started
You can install WebSocket Turbo Intruder directly from the BApp Store, which is the easiest way to get started. Go to Extensions → BApp Store → WebSocket Turbo Intruder and click Install. If you prefer to build it yourself or want to explore the source code, the project is available on GitHub. Once installed, the extension will appear as a new menu item when you right click on any message in Burp Suite.
Basic use
The extension comes with two built-in tools: Turbo Intruder and HTTP Middleware. The first one is best when you want to send thousands of WebSocket messages to a single target and look for interesting behavior. The second one is made for automating scanning, we’ll return to that later.
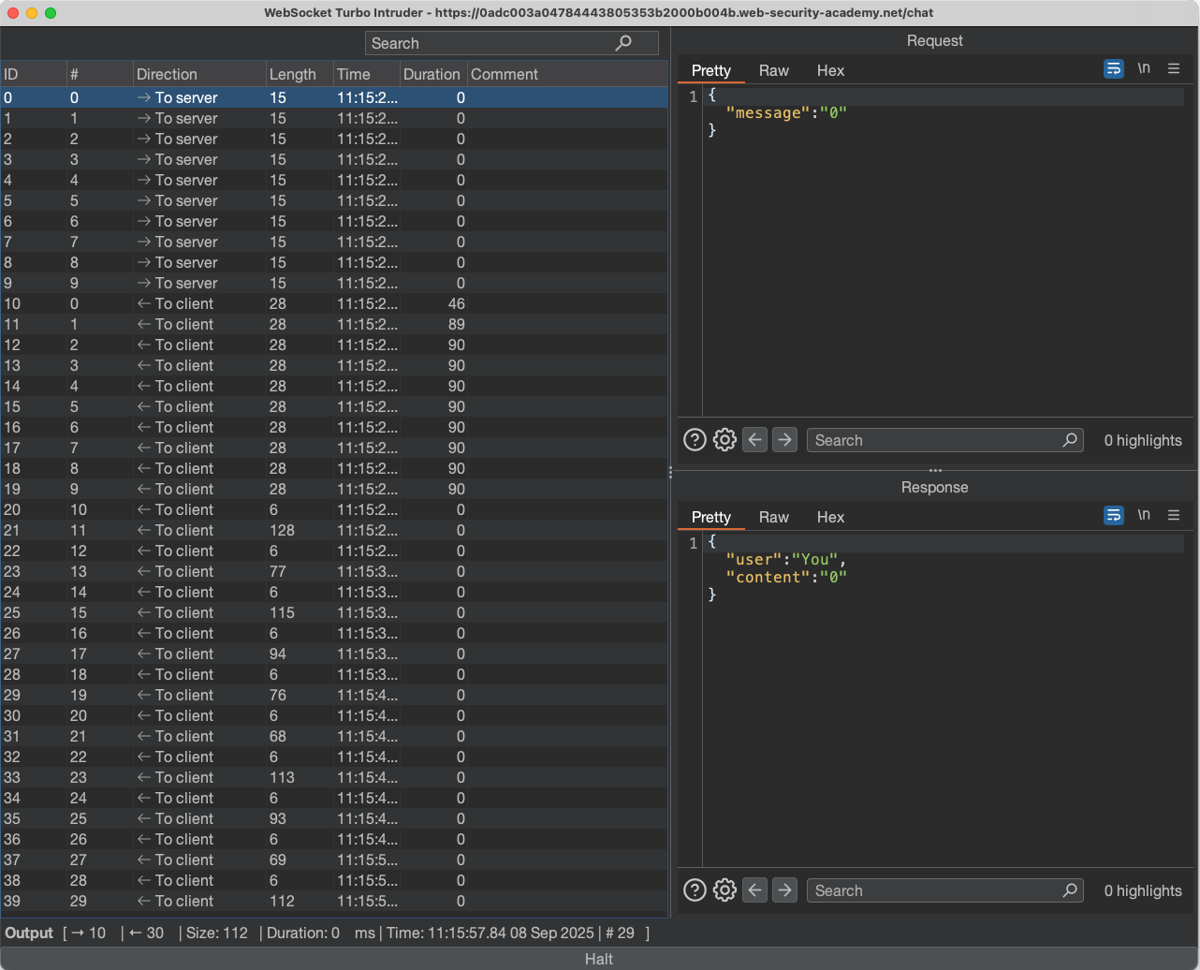
Let’s start with a basic example python script. We will use it to test the PortSwigger Academy lab: Manipulating WebSocket messages to exploit vulnerabilities.
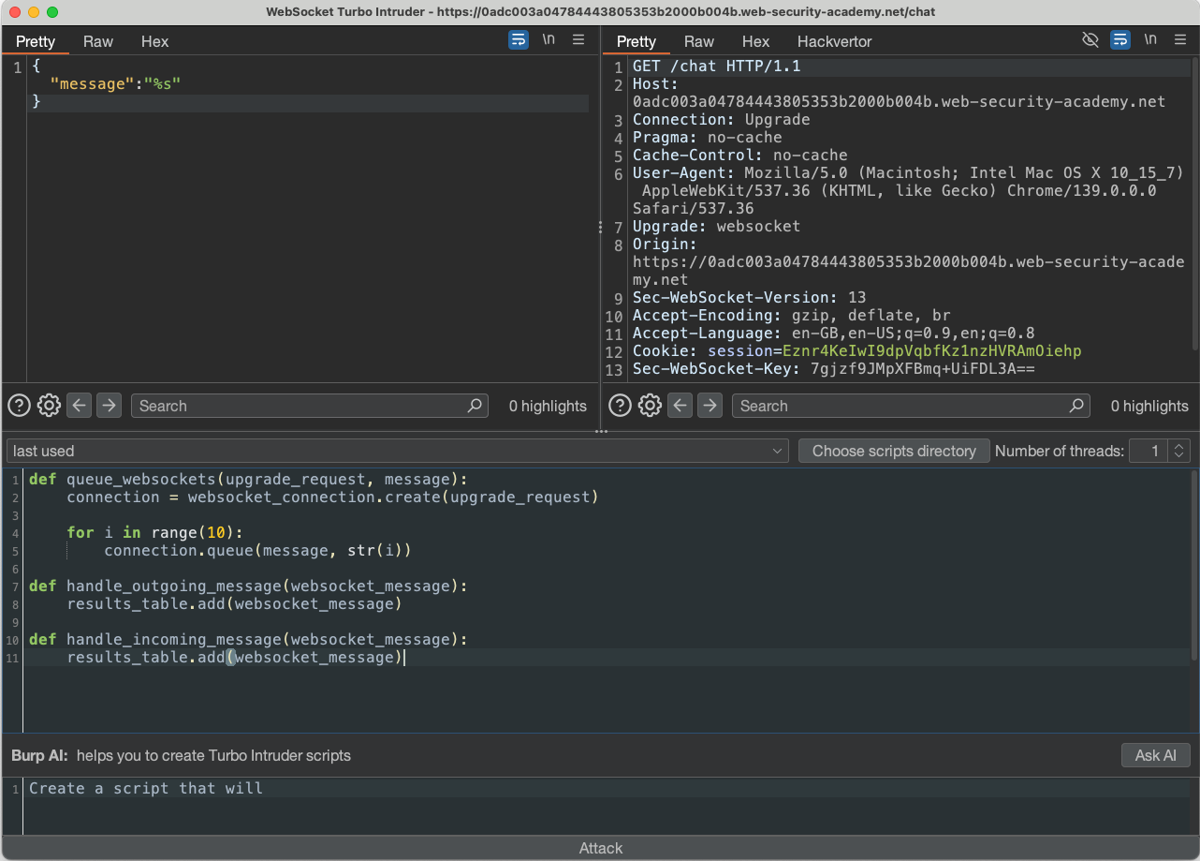
This script sends 10 different numeric values as part of the message JSON value when the Attack button is clicked. The resulting table, shown in the screenshot, will contain all requests (outgoing messages) and responses (incoming messages) handled by the extension.
Filtering boring content
Unlike HTTP, the WebSocket protocol can send multiple incoming messages for one outgoing message. This makes testing much harder, because the table quickly fills with noise. In our case, a single "request" triggers three different "responses". To handle this, the extension includes powerful filters. These let you hide irrelevant traffic and lock requests to only the responses you care about. Here’s an example decorator that keeps only messages from the user Hal Pline and filters out everything else:
def queue_websockets(upgrade_request, message):
    connection = websocket_connection.create(upgrade_request)
    for i in range(10):
        connection.queue(message, str(i))
def handle_outgoing_message(websocket_message):
    results_table.add(websocket_message)
@MatchRegex(r'{"user":"Hal Pline"')
def handle_incoming_message(websocket_message):
    results_table.add(websocket_message)
Automated testing
If manual review of the result table is not your style, you can wrap a WebSocket connection inside an HTTP request using WebSocket Turbo Intruder HTTP Middleware. Select any WebSocket message from Proxy History, then right-click and choose Extensions → WebSocket Turbo Intruder → Send to WebSocket HTTP Middleware. This lets you use filters to capture only the traffic you care about while interacting with the server through a local HTTP endpoint.
For example, here we use the included ServerExample.py script to create a WebSocket connection and filter the incoming messages to only show the ones echoed back from the PortSwigger Academy lab:
def create_connection(upgrade_request):
    connection = websocket_connection.create(upgrade_request)
    return connection
def handle_outgoing_message(websocket_message):
    results_table.add(websocket_message)
@MatchRegex(r'{"user":"You"')
def handle_incoming_message(websocket_message):
    results_table.add(websocket_message)
From now on, we can send an HTTP POST request to localhost, with the request body treated as a WebSocket message. This allows you to scan any WebSocket using an automated scanner like Burp Suite Pro.
POST /proxy?url=https%3A%2F%2F0a7c00a903d17c5a801d35d8008a007a.web-security-academy.net%2Fchat HTTP/1.1
Host: 127.0.0.1:9000
Content-Length: 16

{"message":"hi"}
You can customize this code to match the logic of your target application. This setup is ideal for finding server-side vulnerabilities like SQL injection, authentication bypass, or command injection.
Exploiting vulnerabilities
In addition to the usual application bugs, WebSockets bring their own unique attack surface. We will look at some of these next.
WebSocket Server-side prototype pollution
Socket.IO is a popular JavaScript framework that comes with its own WebSocket implementation. This makes testing more complicated - but with WebSocket Turbo Intruder you can work around these limitations.
The easiest way to confirm that a server uses Socket.IO is by checking the mandatory query parameter EIO, which specifies the protocol version. If it equals 4, the server sends ping packets. We can automate this process with the built-in Ping and Pong decorators. After that, the script sends the initial message "40" to start the conversation, and the rest of the logic works as usual.
import burp.api.montoya.http.message.params.HttpParameter as HttpParameter;
def queue_websockets(upgrade_request, message):
    connection = websocket_connection.create(
        upgrade_request.withUpdatedParameters(HttpParameter.urlParameter("EIO", "4")))
    connection.queue('40')
    connection.queue('42["message","hello"]')
@Pong("3")
def handle_outgoing_message(websocket_message):
    results_table.add(websocket_message)
@PingPong("2", "3")
def handle_incoming_message(websocket_message):
    results_table.add(websocket_message)
HTTP adapter script for the Socket.IO protocol:
import burp.api.montoya.http.message.params.HttpParameter as HttpParameter;
def create_connection(upgrade_request):
    connection = websocket_connection.create(
        upgrade_request.withUpdatedParameters(HttpParameter.urlParameter("EIO", "4")))
    connection.queue('40')
    connection.decIn()
    return connection

@Pong("3")
def handle_outgoing_message(websocket_message):
    results_table.add(websocket_message)
@PingPong("2", "3")
def handle_incoming_message(websocket_message):
    results_table.add(websocket_message)
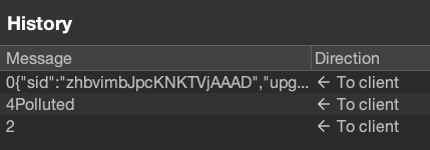
Interestingly, some protocol quirks in Socket.IO make it a good candidate for server-side prototype pollution. As shown in Gareth’s earlier research Server-side prototype pollution: Black-box detection without the DoS, it’s possible to abuse Express server features to detect successful pollution. Using the same technique here, we can trick Socket.IO into returning a new greeting message by polluting the initialPacket property with: {"__proto__":{"initialPacket":"Polluted"}}
Exploit in action:
WebSocket Race Conditions
The default Intruder script sends messages in chunks over a single connection. This is great for performance, but not useful when testing for race condition vulnerabilities, where timing and concurrency matter.
To help with that, WebSocket Turbo Intruder includes a special engine type called THREADED. This engine starts multiple worker threads, each with its own WebSocket connection, and sends messages in parallel. This makes it possible to trigger classic race conditions like logic bypasses, token reuse, or state desync bugs.
Don’t worry if you’re not familiar with Python threading - the included RaceConditionExample.py script needs only small changes to fit your target. The most important settings are defined in the config() method: the number of threads to control how many simultaneous connections are opened.
This threaded model gives you better control over concurrency and lets you experiment with timing-sensitive issues that are invisible to single-connection fuzzing.
WebSocket ping of death
While testing for race conditions, I came across an unexpected denial-of-service vulnerability in a Java WebSocket implementation.
According to the RFC, a WebSocket frame begins with a header specifying the opcode and payload length. But what happens if the length doesn’t match the actual payload - or the payload is never sent at all?
Using the TURBO engine, we can send any kind of WebSocket frame, including malformed ones. This allows us to manually adjust the payload length in the header without needing to send gigabytes of data. Java WebSocket implementation has the following issue. It reads the message header and allocates a huge buffer on the server using user specified value at header payload length field, leading to an Out Of Memory crash if that value is Integer Max Value. After that the server is no longer responding to any connection attempts. You can find the full source code in PingOfDeathExample.py included with the extension.
Advanced features
Command line interface
WebSocket Turbo Intruder also includes a standalone CLI, perfect for automation, scripting, or running attacks outside Burp Suite. Here’s a basic usage example:
java -jar WebSocketFuzzer-2.0.0.jar <scriptFile> <requestFile> <endpoint> <baseInput>
Command-line support is pretty basic. But it’s great for running long attacks on a single target, especially in background jobs.
Debug mode
WebSocket Turbo Intruder includes a built-in WS Logger feature that records up to 1,000 WebSocket messages. This is especially useful when debugging scripts that use HTTP Middleware, where matching outgoing and incoming messages correctly is key.
With the logger enabled on WebSocket Turbo Intruder → Logger On, you can track both message contents and their internal IDs. These IDs are used to pair requests and responses - so if something breaks or a message gets mismatched, you can inspect the logs to figure out what went wrong.
If needed, you can also fine-tune how message IDs are handled by using dec* and inc* methods from the Connection interface. This gives you full control over how messages are assigned and grouped.
References
Whilst working on the WebSocket Turbo Intruder, I drew inspiration from some excellent work, including @albinowax - Turbo Intruder: Embracing the billion-request attack, @garethheyes - Server-side prototype pollution: Black-box detection without the DoS and @vah_13 - Race Conditions in Websockets.
A word of caution
A quick word of caution - WebSocket Turbo Intruder is powerful. It can send thousands of messages per second and open many connections in parallel. If you’re not careful, you might overload the server or trigger denial-of-service conditions. Always use it on targets where automated scanning is allowed, and try not to take down the internet while you’re at it.
Reporting bugs and feature requests
WebSocket Turbo Intruder also supports features like automatic Ping/Pong messages and built-in filtering using the isInteresting() method. You can learn more about these and other advanced options in the Github repository. If you find a bug or have a feature request, feel free to open a new issue.
The recording of the presentation will be available shortly on the Black Hat Arsenal channel.
Good luck, have fun.
Back to all articles