


ProfessionalCommunity Edition
Writing your first Burp Suite extension
-
Last updated: June 18, 2026
-
Read time: 3 Minutes
This tutorial shows you how to write your first Burp Suite extension in Java using the Montoya API. You'll learn how to:
Set your extension's name.
Register a custom context menu item.
Log messages to the Output tab.
Create a custom Burp Suite tab.
Related pages
- Complete code - The full example code for this tutorial.
- Montoya API JavaDoc - reference for all available classes and methods.
Before you begin
Before you begin, you must have:
A working extension development environment.
A Java class for your extension (if you're using the starter project, this is already done for you).
For instructions, see Setting up your extension development environment.
Step 1: Implement the extension interface
If you're using the extension starter project, you can skip to Step 2. This step is already complete.
Note
In this tutorial, we'll use a class named Extension. If you're setting up your development environment manually, you should have already created this class in the previous tutorial. For guidance, see Creating your extension class.
Update your class as follows so that Burp can recognize and run your extension:
Implement the
BurpExtensioninterface.Add an
initialize()method. This is called when Burp loads your extension. It's where you'll register your extension features.Accept a
montoyaApiobject as a parameter. This provides access to Burp's functionality.Use the
@Overrideannotation to help catch errors such as incorrect method names or arguments at compile time.
import burp.api.montoya.BurpExtension;
import burp.api.montoya.MontoyaApi;

public class Extension implements BurpExtension
{
    @Override
    public void initialize(MontoyaApi montoyaApi) {
    // Add your code here
    }
}
Step 2: Set the extension name

Inside the initialize() method, set a name for your extension. This appears in Extensions > Installed when your extension is loaded in Burp.
// Set the extension's name
montoyaApi.extension().setName("My first extension");
Step 3: Add a context menu item
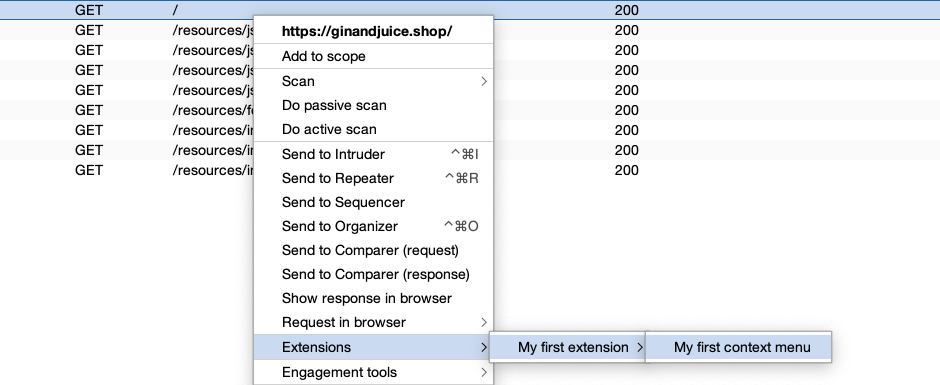
To add an item to Burp's right-click context menu, register a ContextMenuItemsProvider and implement the provideMenuItems() method. Burp calls this method whenever a user opens the context menu:
import burp.api.montoya.ui.contextmenu.ContextMenuItemsProvider;
import burp.api.montoya.ui.contextmenu.ContextMenuEvent;

import javax.swing.*;
import java.awt.*;
import java.util.List;

// ...

// Register a new context menu item provider
montoyaApi.userInterface().registerContextMenuItemsProvider(new ContextMenuItemsProvider()
{
    @Override
    public List<Component> provideMenuItems(ContextMenuEvent event)
    {
    // Add context menu items here
    }
});
Inside the provideMenuItems() method, create a new JMenuItem and set the label that appears in the right-click menu.
JMenuItem menuItem = new JMenuItem("My first context menu");
Use addActionListener() to define what happens when the user clicks the item. In this example, the action listener logs a message to the output stream, using logToOutput(). By default, this message appears under Extensions > Installed in the
Output tab.
menuItem.addActionListener(l -> {
    montoyaApi.logging().logToOutput("Hello, world!");
});
Wrap your context menu item in a list and return it. Burp uses this list to populate the context menu:
return List.of(menuItem);Step 4: Add a custom tab

To add your own tab to Burp, first create a Java Swing JPanel and add any components you want to show in your tab. This simple example adds a label to the panel:
// Create a panel to display in the custom tab
JPanel panel = new JPanel();

// Add text to the panel
panel.add(new JLabel("Hello, world!"));
Once the panel is set up, use registerSuiteTab() to register it as a tab. This method takes a tab title and the component to display.
montoyaApi.userInterface().registerSuiteTab("My extension tab", panel);Complete code
Here's the full example for reference:
import burp.api.montoya.BurpExtension;
import burp.api.montoya.MontoyaApi;
import burp.api.montoya.ui.contextmenu.ContextMenuEvent;
import burp.api.montoya.ui.contextmenu.ContextMenuItemsProvider;

import javax.swing.*;
import java.awt.*;
import java.util.List;

// Step 1: Implement the extension interface
public class Extension implements BurpExtension
{
    @Override
    public void initialize(MontoyaApi montoyaApi)
    {
        // Step 2: Set the extension name
        montoyaApi.extension().setName("My first extension");

        // Step 3: Add a context menu item
        montoyaApi.userInterface().registerContextMenuItemsProvider(new ContextMenuItemsProvider()
        {
            @Override
            public List<Component> provideMenuItems(ContextMenuEvent event)
            {
                JMenuItem menuItem = new JMenuItem("My first context menu");
                menuItem.addActionListener(l -> {
                montoyaApi.logging().logToOutput("Hello, world!");
                });

                return List.of(menuItem);
            }
        });

        // Step 4: Add a custom tab
        JPanel panel = new JPanel();
        panel.add(new JLabel("Hello, world!"));

        montoyaApi.userInterface().registerSuiteTab("My extension tab", panel);
    }
}
Next steps
To test the extension's functionality, build it into a JAR file and load your extension in Burp. For instructions, see Loading your extension in Burp.