


ProfessionalCommunity Edition
Adding a settings panel to your Burp extension
-
Last updated: June 18, 2026
-
Read time: 3 Minutes
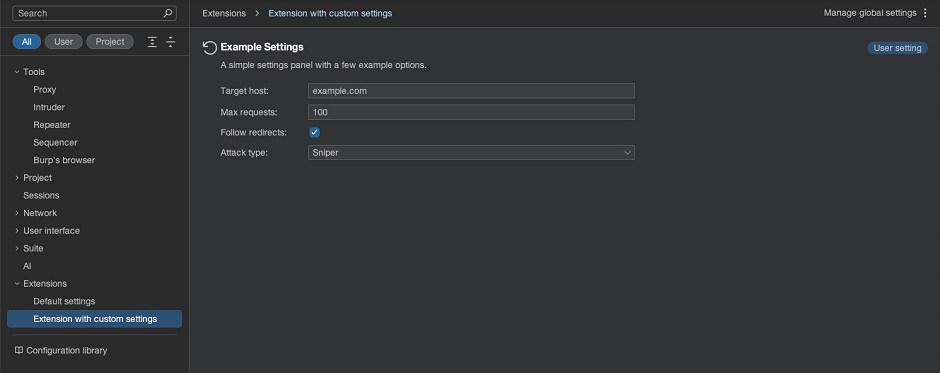
This tutorial shows how to add a custom panel to the Settings dialog using the settingsPanel() builder. This lets your extension capture user-input in a simple and consistent way.
The builder makes it easy to create a well-structured panel, with built-in support for settings persistence. You can add a variety of input types, including text and number fields, checkboxes, and drop-down menus.
Note
If you prefer to review the full example before exploring the individual steps in the tutorial, see the complete code at the bottom of this page.
Step 1: Create a panel
Use the settingsPanel() builder to create your custom panel. You can configure the panel using the following methods:
withPersistence- Control how the user's settings are saved. You can choose from:NONE: Settings not saved between sessions.PROJECT_SETTINGS: Settings are saved to the current project file.USER_SETTINGS: Settings are saved in your user data. They persist across all projects on your machine.
withTitle- Set the name that appears in Burp's Settings > Extensions tab. If omitted, Burp uses your extension name instead.withDescription- Add a short paragraph of text at the top of the panel.withKeywords- Add keywords to help users find the panel via Burp's settings search.
SettingsPanelWithData panel = SettingsPanelBuilder.settingsPanel()
    .withPersistence(SettingPanelPersistence.USER_SETTINGS)
    .withTitle("Example Settings")
    .withDescription("A simple settings panel with a few example options.")
    .withKeywords("Example", "Settings", "Demo")
Step 2: Define your settings
Use withSettings() to define the settings. You can provide default values that appear the first time the user opens the panel, or when no saved value exists.
You can use the following setting types:
stringSetting()- Free-text input.integerSetting()- Whole number input.booleanSetting()- Checkbox (true/false).listSetting()- Dropdown menu to select a single value. The selected value is stored as a string.
Call .build() to complete the panel.
.withSettings(
    SettingPanelSetting.booleanSetting("Follow redirects"), // Without default value
    SettingPanelSetting.stringSetting("Target host", "example.com"), // With default value
    SettingPanelSetting.integerSetting("Max requests", 100), // With default value
    SettingPanelSetting.listSetting("Attack type", List.of("Sniper", "Battering ram", "Pitchfork", "Cluster bomb"), "Sniper") // With default value
    )
.build();
Step 3: Register the settings panel
Use registerSettingsPanel() to register the settings panel with Burp's user interface. This makes the panel available for users, enabling them to view and modify the defined settings:
api.userInterface().registerSettingsPanel(panel);Step 4: Access user-configured setting values
Once you've created the panel, you can access the user-configured values using get...() methods. For example:
String targetHost = panel.getString("Target host");
int maxRequests = panel.getInteger("Max requests");
boolean followRedirects = panel.getBoolean("Follow redirects");
String attackType = panel.getString("Attack type"); // The list setting value is retrieved as a string
Step 5: Use the setting values
You can now use the retrieved values in your extension's logic. For example, this code logs the current configuration for each setting to the output stream. By default, these messages appear under Extensions > Installed in the Output tab:
api.logging().logToOutput("Target host: " + targetHost);
api.logging().logToOutput("Max requests: " + maxRequests);
api.logging().logToOutput("Follow redirects: " + followRedirects);
api.logging().logToOutput("Attack type: " + attackType);
[Optional] Help users find your settings panel
To help users quickly access your extension's settings, you can open the Settings dialog programmatically:
api.userInterface().openSettingsWindow();If you've registered a custom panel, it is selected automatically.
For example, you might use this to add a button to your UI that takes users to your panel.
Complete code
Here's the full example for reference:
import burp.api.montoya.BurpExtension;
import burp.api.montoya.MontoyaApi;
import burp.api.montoya.ui.settings.SettingsPanelBuilder;
import burp.api.montoya.ui.settings.SettingsPanelPersistence;
import burp.api.montoya.ui.settings.SettingsPanelSetting;
import burp.api.montoya.ui.settings.SettingsPanelWithData;

import java.util.List;

public class Extension implements BurpExtension
{
    @Override
    public void initialize(MontoyaApi api)
    {
        api.extension().setName("Extension with custom settings");
        // Step 1: Create a panel
        SettingsPanelWithData panel = SettingsPanelBuilder.settingsPanel()
            .withPersistence(SettingsPanelPersistence.USER_SETTINGS)
            .withTitle("Example Settings")
            .withDescription("A simple settings panel with a few example options.")
            .withKeywords("Example", "Settings", "Demo")
            // Step 2: Define your settings
            .withSettings(
                SettingsPanelSetting.stringSetting("Target host", "example.com"),
                SettingsPanelSetting.integerSetting("Max requests", 100),
                SettingsPanelSetting.booleanSetting("Follow redirects", true),
                SettingsPanelSetting.listSetting("Attack type", List.of("Sniper", "Battering ram", "Pitchfork", "Cluster bomb"), "Sniper")
                )
            .build();

        // Step 3: Register the settings panel
        api.userInterface().registerSettingsPanel(panel);

        // Step 4: Access the user-configured setting values
        String targetHost = panel.getString("Target host");
        int maxRequests = panel.getInteger("Max requests");
        boolean followRedirects = panel.getBoolean("Follow redirects");
        String attackType = panel.getString("Attack type");

        // Step 5: Use the setting values, by logging them to the Output tab
        api.logging().logToOutput("Target host: " + targetHost);
        api.logging().logToOutput("Max requests: " + maxRequests);
        api.logging().logToOutput("Follow redirects: " + followRedirects);
        api.logging().logToOutput("Attack type: " + attackType);
    }
}