


ProfessionalCommunity Edition
Working with JWTs in Burp Suite
-
Last updated: June 18, 2026
-
Read time: 2 Minutes
JSON web tokens (JWTs) are a standard format for sending cryptographically signed JSON data between systems. They're commonly used in authentication, session management, and access control mechanisms. This means that if an attacker can successfully modify a JWT, they may be able to escalate their own privileges or impersonate other users.
You can use Burp Inspector to view and decode JWTs. You can then use the JWT Editor extension to:
- Generate cryptographic signing keys.
- Edit the JWT.
- Resign the token with a valid signature that corresponds to the edited JWT.
You can follow along with the process below using our JWT authentication bypass via unverified signature lab.
Before you start
Install the JWT Editor extension. For more information, see Installing extensions from the BApp Store.
Viewing JWTs
-
Identify a request with a JWT that you want to investigate further. Look for the highlighted requests in Proxy > HTTP history, these are automatically flagged by the JWT Editor extension.

-
To view the JWT contents, highlight sections of the token in turn. Notice that the content is automatically decoded in the Inspector panel.
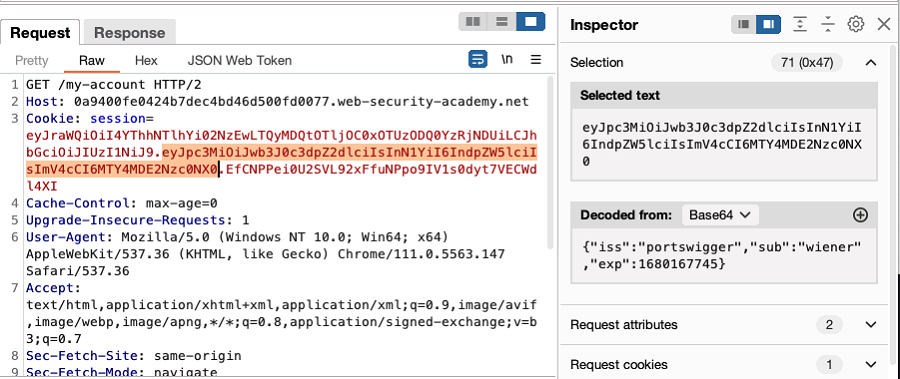
- Review the contents of the JWT in the Inspector panel, to identify interesting information and determine any modifications that you want to make.
Editing JWTs
To edit a JWT using the JWT Editor extension:
- Right-click the request with the JWT and select Send to Repeater.
- In the request panel, go to the JSON Web Token tab.
- Edit the JSON data as required in the Header and Payload fields.
- Click Sign. A new dialog opens.
- In the dialog, select the appropriate signing key, then click OK. The JWT is re-signed to correspond with the new values in the header and payload. If you haven't added a signing key, follow the instructions below.
Adding a JWT signing key
To add a signing key to Burp using the JWT Editor extension:
- Go to the JWT Editor Keys tab.
- Click the button for the type of key that you want to add. For example, New Symmetric Key. A new dialog opens.
-
In the dialog, add the new key:
- Click Generate to create a new key.
- Alternatively, paste an existing key into the dialog.
- Edit the key as required.
- Click OK to save the key.
Related pages
- Academy: JWT attacks