


Professional
Custom scan checks writing guide
-
Last updated: June 18, 2026
-
Read time: 12 Minutes
You can extend Burp Scanner by writing your own scan checks. A custom scan check may detect vulnerabilities that Burp Scanner doesn't detect natively.
This guide includes the following to help you write your own Java-based custom scan checks:
- How to choose the right type of scan check.
- The basic structure of a scan check.
- Common patterns and code snippets.
Related pages
- Creating custom scan checks.
- Testing custom scan checks.
- For instructions on creating BCheck-based custom scan checks, see BCheck definitions.
- To view examples of custom scan checks that have been created by our researchers and the community, see our Bambdas GitHub repository - Custom scan checks.
Choosing the right check type
Before you create a scan check, you must decide the following:
The type - Active or Passive.
When it runs - Per host, Per request, or Per insertion point.
Whether it uses Collaborator - The Use Collaborator toggle enables you to build checks that detect out-of-band issues, and define how Burp handles and reports them.
Burp automatically registers the check according to your selection.
Active and passive checks
Passive checks analyze existing traffic without sending any new requests. Use these to detect vulnerabilities that are visible directly in responses, such as:
Missing security headers.
Leaked server information in error messages.
Insecure cookies or form configurations.
Active checks send additional, modified requests to probe for vulnerabilities. Use these to detect issues that only appear when requests are manipulated, such as:
SQL injection.
Server-side template injection.
Command injection.
Related pages
For worked examples of active and passive scan checks, see the following:
When checks run during a scan
Checks can run at different scopes during a scan. This enables you to detect both broad configuration issues and fine-grained input-handling vulnerabilities.
Check type |
When it runs |
When to use it |
Example use cases |
Host check |
Once per unique host. |
Use for checks that only need host-level information. |
Checking for well-known files (such as |
Request check |
Once for every request. |
Use for analyzing or manipulating full requests or responses. |
Detecting exposed API keys or insecure redirects. |
Insertion-point check (active only) |
Once for each insertion point. |
Use for active checks that inject payloads into parameters, headers, or other modifiable parts of a request. |
Testing for input-handling vulnerabilities like SQL injection or XSS. |
Related pages
To learn more about what insertion points are and how they're handled by Burp Scanner, see Auditing - Insertion points.
Using Collaborator in checks
You can use Burp Collaborator in active custom scan checks to detect vulnerabilities that require out-of-band interaction testing. This enables you to build checks that detect out-of-band issues, and define how Burp handles and reports them.
To enable Collaborator interaction in a custom scan check:
Enable the Use Collaborator toggle. The Collaborator tab appears.
Add your interaction handler (the script that processes Collaborator interactions) in the Collaborator tab.
When you run the check, Burp automatically:
Polls Collaborator in the background.
Processes Collaborator interactions when they occur, passing them to your handler to analyze and report any resulting issues.
The scan check remains active unless it is deleted, so Burp can detect delayed Collaborator interactions even after the scan completes.
For an example of this check, see Using Collaborator in scan checks.
Note
When Collaborator issues are reported from custom scan checks, Burp displays the base request rather than the modified version. This is because Burp doesn't retain the full context needed to reconstruct the modified request.
If required, you can recreate the modified version in your handler using your original scan check logic.
Structure of a custom scan check
Every custom scan check follows the same general pattern:
Validating that a response exists
To avoid unnecessary processing or errors, add checks for empty content before acting on a response.
Note
Some scan checks only need the request, for example to analyze request headers or parameters. These don't require a response check.
Passive checks
Passive checks usually analyze the base response. Burp Scanner typically provides both a request and response, however in some cases a response may not be available, for example, when scanning items from Repeater. In this situation, your check should exit cleanly:
if (!requestResponse.hasResponse()) {
    return AuditResult.auditResult();
}
Active checks
Active checks create and send additional requests. In these cases, you should verify that the response to the sent request exists before acting on it. For example:
var rr = http.sendRequest(requestResponse.request());
if (!rr.hasResponse()) {
    return AuditResult.auditResult();
}
Performing checks
Performing a check can involve two main steps:
Modify the request - For active checks only, build and send modified versions of the base request to probe for vulnerabilities.
Inspect traffic - For all checks, analyze messages, compare them against each other, or look for other behavioral differences that may indicate a vulnerability.
Warning
Each check runs for a maximum of two minutes. If your code takes longer than this, Burp automatically interrupts the check.
Slow or resource-intensive code can impact overall performance and make scans run more slowly. Write your check carefully to stay within the time limit and minimize performance impact.
Modifying requests (Active checks)
For active checks, you'll send modified versions of the base request to probe for vulnerabilities. The approach depends on whether you're working at the request / host level, or the insertion-point level.
Request or host checks
Use HttpRequestResponse to modify and send the request:
// Build a modified request
var modifiedRequest = requestResponse.request()
    .withAddedParameters("test", "canary123")
    .withBody("modified body content");

// Send the request
var rr = http.sendRequest(modifiedRequest);

// Exit early if there is no response
if (!rr.hasResponse()) return AuditResult.auditResult();
Insertion point checks
Use AuditInsertionPoint to build and send payloads for each insertion point.
Your payloads should be value-only, as Burp applies context-aware encoding for each insertion point location. Each payload must be provided as a ByteArray: Burp expects raw bytes rather than plain strings.
// Build a modified request for this specific insertion point (value-only payload)
var reqWithPayload = insertionPoint.buildHttpRequestWithPayload(ByteArray.byteArray(payload));

// Send the request
var rr = http.sendRequest(reqWithPayload);

// Exit early if there is no response
if (!rr.hasResponse()) return AuditResult.auditResult();
Insertion point checks - multiple payloads
To send more than one payload to each insertion point, iterate through them in a loop.
// Example payloads to test for reflection or injection
var payloads = List.of("canary123", "<script>alert(1)</script>");

for (var payload : payloads) {
    // Build a request for this insertion point (value-only payload)
    var reqWithPayload = insertionPoint.buildHttpRequestWithPayload(
    ByteArray.byteArray(payload, StandardCharsets.UTF_8)
    );

    // Send the request
    var rr = http.sendRequest(reqWithPayload);

    // Skip to the next payload if there is no response
    if (!rr.hasResponse()) continue;

    // Process results
}
Inspecting traffic (Active and passive checks)
You can use an HttpRequestResponse object and call response() to access the corresponding HttpResponse. This enables you to inspect traffic for signs of vulnerabilities.
Detect payload reflections
Look for payload markers in the response. This is useful for identifying potential reflection or injection points.
// Build a modified request with a unique marker
var marker = "canary123";
var modifiedRequest = requestResponse.request()
    .withAddedHeader("X-Test", marker);

// Send the request
var rr = http.sendRequest(modifiedRequest);

// Check the response for the marker
if (rr.hasResponse() && rr.response().body().indexOf(marker, false) > -1) {
    // Reflected input detected
}
Related pages
To see this technique in a complete check, see the Detect TRACE method script in the Bambdas GitHub repository.
Check specific response elements
Check specific parts of the response for specific elements. For example, check that required headers, cookies, or metadata values are present and correctly configured.
// Access the base response
var response = requestResponse.response();

// Check for a missing header
var hasXfo = response.hasHeader("X-Frame-Options");
if (!hasXfo || response.headerValue("X-Frame-Options").isEmpty()) {
    // Expected header is missing or empty
}

requestResponse.response().hasHeader("X-Frame-Options")

return AuditResult.auditResult();
Related pages
To see this technique in a complete check, see the CORS misconfiguration script in the Bambdas GitHub repository. We also unpack this script in our Active scan check worked example.
Compare responses
Send two requests and compare their responses for behavioral differences, for example in status codes, content, or sizes:
// Send a baseline and a variant request
var baseline = http.sendRequest(requestResponse.request().withMethod("GET"));
var variant  = http.sendRequest(requestResponse.request().withMethod("POST"));

// Define which response attributes to compare
var attributeTypes = new AttributeType[]{
    AttributeType.STATUS_CODE,
    AttributeType.CONTENT_LENGTH,
    AttributeType.BODY_CONTENT
};

// Extract attributes from both responses for comparison
if (baseline.hasResponse() && variant.hasResponse()) {
    var baselineAttributes = baseline.response().attributes(attributeTypes);
    var variantAttributes = variant.response().attributes(attributeTypes);

    // Loop through the attributes one by one
    for(int i=0; i < 3; i++) {
        var baselineAttribute = baselineAttributes.get(i);
        var variantAttribute =  variantAttributes.get(i);

        if(baselineAttribute.type() == AttributeType.STATUS_CODE) {
        // Compare status code and log differences
            if(baselineAttribute.value() != variantAttribute.value()) {
                api().logging().logToOutput("Status codes are different");
            }
        }

        if(baselineAttribute.type() == AttributeType.CONTENT_LENGTH) {
        // Compare content length and log differences
            if(baselineAttribute.value() != variantAttribute.value()) {
                api().logging().logToOutput("Content length is different");
            }
        }

        if(baselineAttribute.type() == AttributeType.BODY_CONTENT) {
        // Compare body content and log differences
            if(baselineAttribute.value() != variantAttribute.value()) {
                api().logging().logToOutput("Content is different");
            }
        }
    }
}

return AuditResult.auditResult();
Identify timing differences
Compare the time taken for responses using the responseTime() property:
// Send a baseline and a variant request
var baseline = http.sendRequest(requestResponse.request());
var variant  = http.sendRequest(
    requestResponse.request().withAddedHeader("Cookie", "TrackingId=x'||pg_sleep(5)--")
);

// Compare response times
if (baseline.hasResponse() && variant.hasResponse()) {
    var baseTiming = baseline.timingData();
    var variantTiming = variant.timingData();

    if(baseTiming.isPresent() && variantTiming.isPresent()) {
        var baseMs = baseTiming.get().timeBetweenRequestSentAndStartOfResponse();
        var varMs  = variantTiming.get().timeBetweenRequestSentAndStartOfResponse();
        var timingThresholdMs = 4000;

        if (varMs.toMillis() - baseMs.toMillis() >= timingThresholdMs) {
            // Significant timing difference detected
        }
    }
}

return AuditResult.auditResult();
Reporting results
Every custom scan check must return an AuditResult, which tells Burp whether the check found any issues. You must return:
An
AuditResultcontaining one or moreAuditIssueobjects when a vulnerability is found.An empty result when no issues are found.
Creating an audit issue
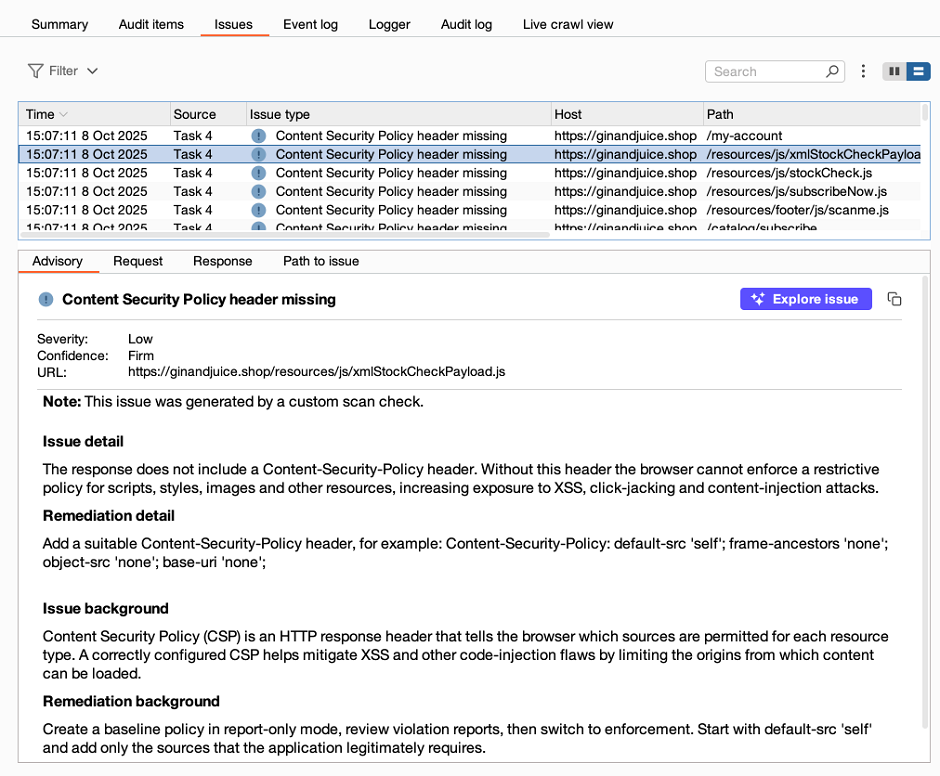
When your check detects a vulnerability, return an AuditResult that wraps an AuditIssue. Users can view the resulting issue in the All issues panel (accessible from the bottom dock) or from the Issues tab for the relevant task on the Dashboard.
Each AuditIssue uses the following structure:
return AuditResult.auditResult(
    AuditIssue.auditIssue(
        "TITLE_HERE",
        "DETAIL_HERE",
        "REMEDIATION_HERE",
        "URL_HERE",
        AuditIssueSeverity.SEVERITY_HERE, // INFORMATION / LOW / MEDIUM / HIGH
        AuditIssueConfidence.CONFIDENCE_HERE, // TENTATIVE / FIRM / CERTAIN
        "ISSUE_BACKGROUND_HERE",
        "REMEDIATION_BACKGROUND_HERE",
        AuditIssueSeverity.OVERALL_SEVERITY_HERE, // INFORMATION / LOW / MEDIUM / HIGH
        REQUEST_RESPONSE_HERE // HttpRequestResponse object(s)
    )
);
Note
- All string fields can include HTML. Always encode untrusted values first.
- For unnecessary fields, pass
""for strings ornullfor all other values. -
Always include a
URL, as this determines which request the issue is reported against. If it's missing, the issue won't appear in the results.
This example reports a missing Content-Security-Policy header:
return AuditResult.auditResult(
    AuditIssue.auditIssue(
        "Content Security Policy header missing", // Title
        "The response doesn't include a <code>Content-Security-Policy</code> header.", // Detail
        "Add a CSP header, e.g. <code>default-src 'self'; frame-ancestors 'none'; object-src 'none'; base-uri 'none';<code> .", // Remediation
        requestResponse.request().url(), // URL
        AuditIssueSeverity.MEDIUM, // Severity rating for this finding
        AuditIssueConfidence.FIRM, // Confidence rating
        "A correctly configured CSP helps mitigate code-injection flaws", // Issue background
        "", // Remediation background (none provided)
        AuditIssueSeverity.MEDIUM, // Overall severity for this issue type
        requestResponse // The base HTTP request and response
    )
);
Breakdown of an audit issue
Title - A short, clear issue name.
Detail - A detailed description of the vulnerability.
Remediation - Practical steps to fix the issue.
URL - The URL or endpoint where the issue was identified. For more information, see Setting the URL.
Severity - The severity rating for this specific finding. Choose from
INFORMATION,LOW,MEDIUM, orHIGH.Confidence - How confident the check is that the issue is real. Choose from
TENTATIVE,FIRM, orCERTAIN.Issue background - Extra information about this type of issue.
Remediation background - Extra information about remediation.
Overall severity - The typical severity rating for this issue type. Choose from
INFORMATION,LOW,MEDIUM, orHIGH.HTTP messages - One or more
HttpRequestResponseobjects that illustrate the issue. Burp displays these in Request and Response tabs in the Issues list.
Setting the URL
You must always include a URL that the issue is reported against. Choose the most useful URL for a tester reproducing the issue. Depending on your check type, use one of the following approaches:
Base request URL
Point to the base request URL for the following issues:
The issue is visible in an unmodified response.
The vulnerability impacts the overall behavior of an endpoint.
requestResponse.request().url();Root of the site
For host-level checks, point to the root of the site or service. This ensures consistent reporting even if the check runs against a subpath.
requestResponse.request().httpService().toString();Modified request URL
If a modified request demonstrates the issue directly, link the finding to the specific payload that triggered it.
// Send the modified request
var rr = http.sendRequest(modifiedRequest);

// Use the URL of the modified request that demonstrated the issue
rr.request().url();
Reporting multiple issues
Sometimes a single check identifies more than one finding. In this situation, you can return multiple AuditIssue objects. Burp reports each issue separately:
var issue1 = AuditIssue.auditIssue(...);
var issue2 = AuditIssue.auditIssue(...);

return AuditResult.auditResult(issue1, issue2);
This example reports two missing security headers:
var issue1 = AuditIssue.auditIssue(
    "Content Security Policy header missing",
    "The response doesn't include a <code>Content-Security-Policy</code> header.",
    "Add a CSP header, e.g. <code>default-src 'self'; frame-ancestors 'none'; object-src 'none'; base-uri 'none';</code>.",
    requestResponse.request().url(),
    AuditIssueSeverity.MEDIUM,
    AuditIssueConfidence.FIRM,
    "A correctly configured CSP helps mitigate code-injection flaws.",
    "",
    AuditIssueSeverity.MEDIUM,
    requestResponse
);

var issue2 = AuditIssue.auditIssue(
    "X-Frame-Options header missing",
    "The response doesn't include an <code>X-Frame-Options</code> header.",
    "Add an <code>X-Frame-Options: DENY</code> or <code>SAMEORIGIN</code> header to protect against clickjacking.",
    requestResponse.request().url(),
    AuditIssueSeverity.LOW,
    AuditIssueConfidence.FIRM,
    "X-Frame-Options helps prevent the site from being framed by other domains.",
    "",
    AuditIssueSeverity.LOW,
    requestResponse
);

return AuditResult.auditResult(issue1, issue2);
Returning an empty result
When your check produces no issues, return an empty result using:
return AuditResult.auditResult();Collaborator-enabled checks
Some vulnerabilities can only be confirmed through out-of-band interaction testing.
This example shows how to use Burp Collaborator in an active custom scan check to detect an email-splitting issue. The check generates Collaborator payloads, sends them in requests, and defines how Burp should process any resulting interactions.
Note
Burp keeps polling Collaborator as long as the scan check exists in your project, so delayed interactions are still detected after the scan completes.
Code tab
    // Specify the domain you want to target
    var spoofServer = "target.domain";

    // Define a technique to spoof an email response
    var techniques = new String[]{
    "=?x?q?$COLLABORATOR_PAYLOAD=40$COLLABORATOR_SERVER=3e=00?=foo@$SPOOF_SERVER"
    };

    // Generate a payload for each technique
    for (var technique: techniques) {
    var payload = collaboratorClient.generatePayload();
    technique = technique.replaceAll("[$]COLLABORATOR_SERVER", payload.server().get().address());
    technique = technique.replaceAll("[$]COLLABORATOR_PAYLOAD", payload.id().toString());
    technique = technique.replaceAll("[$]SPOOF_SERVER", spoofServer);

    // Insert the payload into the request and send it
    HttpRequestResponse reqResp = http.sendRequest(insertionPoint.buildHttpRequestWithPayload(ByteArray.byteArray(technique)));
    }

    // Return no issue here as interactions will be handled via the Collaborator tab
    return AuditResult.auditResult();
Collaborator tab
Enable the Use Collaborator toggle to access the Collaborator tab.
    // Early exit if no SMTP interaction occurred
    if (!interaction.smtpDetails().isPresent()) return AuditResult.auditResult();

    // Recreate the payload with placeholders
    var technique = "=?x?q?$COLLABORATOR_PAYLOAD=40$COLLABORATOR_SERVER=3e=00?=foo@$SPOOF_SERVER";
    HttpRequest req = insertionPoint.buildHttpRequestWithPayload(ByteArray.byteArray(technique));
    HttpRequestResponse reqRes = HttpRequestResponse.httpRequestResponse(req, requestResponse.response());

    // Helper function to convert newlines to HTML breaks
    Function<String, String> newLinesToBr = s -> s.replaceAll("\\r?\\n","<br>");

    // Extract interaction details for reporting
    var id = interaction.id().toString();
    var conversation = interaction.smtpDetails().get().conversation().substring(0, 500) + "...";

    // Define issue metadata
    var title = "Email address parser discrepancy";
    var detail = "This site is vulnerable to an email splitting attack below is the SMTP conversation: "
    + utilities().htmlUtils().encode(conversation);

    // Remediation guidance
    var remediation = """
    - Reject any address containing =? ... ?= ("encoded-word") patterns with a simple regex such as =[?].+[?]= before further processing.
    - Disable or strictly configure legacy address parsing features in mail libraries (UUCP bang paths, source routes, UTF-7, IDN/Punycode) whenever they are not required.
    - Never base authorization decisions solely on the claimed email domain. Instead, verify ownership (for example, by sending a one-time link) or use cryptographically strong identity assertions.
    - Ensure server-side validation is performed by the same library that ultimately sends or stores the address, avoiding mixed-parser discrepancies.
    """;

    // Background information about the vulnerability
    var background = """
    Email syntax is governed by decades-old RFCs that permit comments, quoted local-parts, multiple encodings and obsolete routing notations.
    Modern web applications often validate addresses with a simple regex or framework helper, then pass them to deeper libraries (SMTP clients, IDN converters, etc.).
    An attacker can embed control characters or secondary @ symbols that survive the first check but are re-interpreted later, redirecting mail delivery or splitting the address during SMTP
    dialogue.
    The impact ranges from account takeover to cross-tenant data exposure and, where rendered in HTML contexts, stored XSS leading to RCE.
    """;

    var remediationBackground = """
    The simplest and most effective defense is disable: "encoded-word" as they are unnecessary in user registration flows and can be blocked cheaply.
    Disabling rarely used address forms in mail libraries closes additional vectors, while eliminating domain-based access checks removes the underlying trust flaw.
    Where email addresses must be accepted verbatim (for example, mail clients), sanitize or escape them before insertion into HTML or SQL contexts and confirm delivery via out-of-band verification.
    """;

    // Build and return the audit issue
    return AuditResult.auditResult(AuditIssue.auditIssue(
    title,
    newLinesToBr.apply(detail),
    newLinesToBr.apply(remediation),
    reqRes.request().url(),
    AuditIssueSeverity.MEDIUM,
    AuditIssueConfidence.FIRM,
    newLinesToBr.apply(background),
    newLinesToBr.apply(remediationBackground),
    AuditIssueSeverity.MEDIUM,
    reqRes
    ));